

| Financial 2013 Add Transferred Assets List |
   |
To add the transferred assets list, first
select the main transfer entry from the Transferred Assets block. Next,
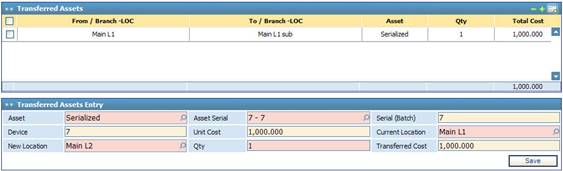
in the Transferred Assets List block click ![]() . Accordingly, a second Transferred Asset Entry block appears
at the bottom of the page through which you need to perform the following
steps:
. Accordingly, a second Transferred Asset Entry block appears
at the bottom of the page through which you need to perform the following
steps:
§ Select the transferred Asset. Assets were previously defined through the Definitions page. Asset serials are filtered according to the selected branch;
§ The asset’s Batch number will be automatically retrieved by the system;
§ The asset Device, Unit Cost, and Transferred Cost are automatically retrieve by the system according to the selected asset Serial or Batch number;
§ The Current Location is automatically retrieved by the system. However, if the asset is located in more than one location, for example in the 3rd and 4th floors of the company, then you can select the location from a list of current asset locations;
§ Select the New Location of the transferred asset from a list of locations that were previously defined through the Locations page. Locations are filtered according to the selected branch;
§ Enter the Quantity of the transferred asset(s). If the asset is serialised, then the quantity needs to be set to 1. Otherwise, if the asset is in a batch then you need to enter the quantity of transferred assets. Note that the quantity of non-serialised transferred assets need to be less or equal to the batch quantity;
§ Click ![]() to save your work.
to save your work.
Related Topics
| |