

| Financial 2013 Adding Accounts |
   |
To create a new account within a certain
main account, select the required main account from the left block. Click ![]() in the Chart of Accounts
block and proceed with the following steps in the Chart of Accounts Entry
block:
in the Chart of Accounts
block and proceed with the following steps in the Chart of Accounts Entry
block:
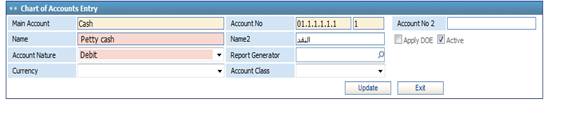
§ The selected Main Account is automatically displayed by the system. This field is read-only;
§ A unique Account Number is auto-generated by the system for this account. The account number will be based on the segment structure that was previously set through the Financial Setup module in the Segments page. For example, the Segment Code for GL Accounts could be built in a manner to contain Main Account Code, Department Code and Project Code as follows: Main/Dep/Proj/Account Code. Accordingly, through the Segments page, you can specify these different segments for every new account to form the final Account Code reflected in the Chart of Accounts of the company. Also, you can enter the user number next to the Account Number, if so desired;
§ Enter the Name of the account;
§ In Name 2 you can also enter the account name in the second language of the system;
§ Check-in the Apply DOE to include this account when calculating the difference of exchange;
§ By default, the system automatically sets this account entry as active. Accordingly, the Is Active checkbox is automatically checked-in by the system and disabled. Upon save, you can change the status of the account;
§ Specify the Account Nature of this newly added account (Debit or Credit);
§ The Reports Generator field is disabled and can be updated only after saving this entry;
§ Select the Currency from a predefined list of currencies;
§ Select the Account Class (whether it is General , Revenue , fees , tax or DOE .. etc)
§ Click ![]() to save your work;
to save your work;
§ Click ![]() to close the Chart of
Accounts Entry block.
to close the Chart of
Accounts Entry block.
Note that you can only add accounts to main
accounts of least level in the main accounts chart.
Related Topics
| |