

| Financial 2013 Adding New Customers |
   |
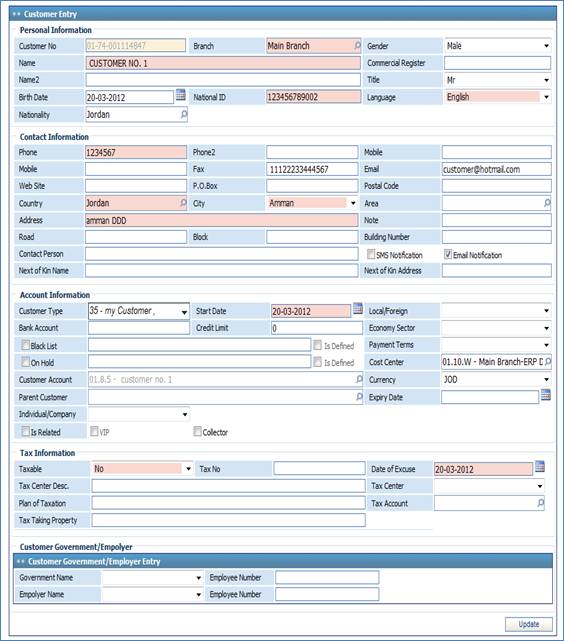
To add a new customer, click ![]() and perform the following steps:
and perform the following steps:
Personal
Information
§ The Customer Number will be given by the system after saving the new profile;
§ Select the company Branch for dealing with this customer;
§ Select the Gender of the customer;
§ Enter the English Name of the customer. In Name 2 you can enter the customer name in the second language of the system;
§ Select the Title and Commercial Name of the customer;
§ Enter the Birth Date and National ID for this customer;
§ Select the Language used with this customer;
§ Select the Nationality of the customer;
Contact Information
§ Enter the Phone, Mobile, Fax, Email and Website of this customer;
§ Enter the P.O. Box address and Postal Code of this customer;
§ Select the Country, City, and Area of this customer; you can select from lists of values that were defined in the Preferences sub-module;
§ Enter the detailed Address for this customer;
§ Type any necessary Notes concerning the contact information;
§ Enter the Road, Block and the Building Number;
§ Enter the Contact Person for this customer;
§ Check-in the SMS Notification checkbox to allow sending SMS notifications for this customer;
§ Check-in the Email Notification checkbox to allow sending email notifications for this customer;
§ Enter the Next of Kin Name and Address;
Account Information
§ Select the Customer Type from a list of types that were previously defined in the Customer Types page; this determines the account creation method for the customer;
§ Enter the Start Date for dealing with this new customer;
§ Specify whether the added customer is a local customer or foreign customer in the Local/ Foreign field;
§ Enter the customer's Bank Account number;
§ Enter the customer's Credit Limit;
§ Select the Economy Sector of this customer;
§ You can include the customer in the Black List to prevent any transaction with this customer by checking-in the given checkbox and specifying the reason in the field that follows or use a predefined reason by checking-in the Is Defined checkbox and selecting the reason;
§ Select the Payment Terms that were agreed on with the customer. Payment terms can be defined in the Financial Setup sub-module;
§ To prevent any transaction with this customer, check-in the On Hold checkbox and specify the reason in the field that follows or use a predefined reason by checking-in the Is Defined checkbox and selecting the reason. The system warns you when making any type of transaction with a customer that is On Hold;
§ Select the Cost Centre that will be affected with this customer. Cost centres can be defined in the Cost Centres page;
§
Select the
Customer Account. If
the selected customer type was defined with a ‘Fixed’ account creation setup,
then the system will automatically create a new account for this customer Else
if the customer type was defined with an ‘Auto’ account creation setup, then the system will automatically take the account set for the selected Customer
Type in the Customer Types page.;
§ Select the Currency used in dealing with this customer. Accordingly, all customer invoices will be generated in this currency;
§ If you have selected a certain customer before adding, select the Parent Customer if you want to add this customer as a sub-customer to the selected customer;
§ Select the Expiry date for this account;
§ Specify whether the added customer is an Individual or Company. If the added customer is an individual, then you will need to specify his/ her Office Address. Else if the added customer is a company, then you will need to specify the Manager Name and ID;
§ Check-in the Is Related checkbox if the added customer is related to your company;
§ Check-in the VIP checkbox if the added customer is a VIP customer;
§ Check in the Collector checkbox if the added customer is a collector ;
Tax Information
Customer Government/Employer
Select the Account Creation method
(Fixed/ Auto). If the account creation is set to Fixed, then you need to add the
Customer Type Account(s). If the account
creation is set to Auto then the system will automatically generate a new
account for this customer, allocated under the selected Main Account in the Chart of
Accounts of the company.
Related Topics
| |