

| Financial 2013 Adding Suppliers |
   |
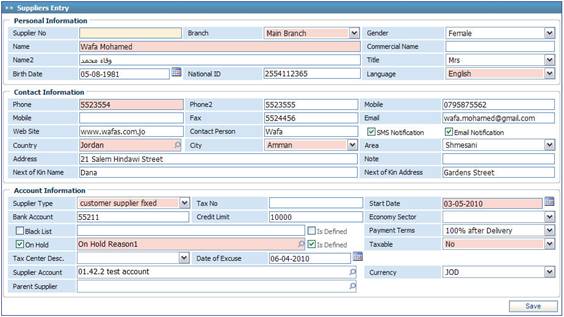
To add a new supplier, click ![]() and perform the following steps:
and perform the following steps:
Personal
Information
§ The Supplier Number will be given by the system after saving the new profile;
§ Select the company Branch for dealing with this supplier;
§ Select the Gender of the supplier;
§ Enter the English Name of the supplier. In Name 2 you can enter the supplier name in the second language of the system;
§ Select the Title and Commercial Name of the supplier;
§ Enter the Birth Date and National ID for this supplier;
§ Select the Language used with this supplier;
§ Select the Supplier’s Nationality ;
Contact Information
§ Enter the Phone, Mobile, Fax, Email and Website of this supplier;
§ Enter the Contact Person for this supplier;
§ Check-in the SMS Notification checkbox to allow sending SMS notifications for this supplier;
§ Select the Country, City, and Area of this;
§ Enter the detailed Address for this supplier;
§ Type any necessary Notes concerning the contact information;
§ Enter the Supplier’s Road, Block and Building Number ;
§ Enter a Contact Person to be contacted in case of emergencies;
§ Check-in the SMS Notification checkbox to allow sending SMS notifications for this supplier;
§ Check-in the Email Notification checkbox to allow sending email notifications for this supplier;
§ Enter the Next of Kin Name and Address;
Account Information
§ Select the Supplier Type from a list of types that were previously defined in the Customer/ Supplier Types page; this determines the account creation method for the supplier;
§ For taxable suppliers, enter the Tax Number;
§ Enter the Start Date for dealing with this new supplier;
§ Enter the supplier 's Bank Account number;
§ Enter the supplier 's Credit Limit;
§ Select the Economy Sector of this supplier;
§ You can include the supplier in the Black List to prevent any transaction with this supplier by checking-in the given checkbox and specifying the reason in the field that follows or use a predefined reason by checking-in the Is Defined checkbox and selecting the reason;
§ You set the supplier On Hold, for any reason possible by checking-in the On Hold checkbox and specify the reason in the field that follows or use a predefined reason by checking-in the Is Defined checkbox and selecting the reason. This is used for informative purposes only; no action will be taken for On Hold suppliers;
§ Select the Payment Terms that were agreed on with the supplier. Payment terms can be defined in the Financial Setup sub-module;
§ Select the Cost Centre that will be affected with this supplier. Cost centres can be defined in the Cost Centres page;
§
Select the
Supplier Account. If this field remains empty then the system
will automatically take the account set for the selected Supplier Type
in the Customer/ Supplier Types page;
§ Select the Currency used in dealing with this supplier. Accordingly, all supplier invoices will be generated in this currency;
§ Select the Parent Supplier if you want to add this supplier as a sub- supplier to another supplier;
§ Select the Expiry date for this account;
§ Specify whether the added customer is an Individual or Company. If the added customer is an individual, then you will need to specify his/ her Office Address. Else if the added customer is a company, then you will need to specify the Manager Name and ID;
§ Check-in the Is Related checkbox if the added customer is related to your company;
§ Check-in the VIP checkbox if the added customer is a VIP customer;
Tax Information
§ Use the given Taxable drop-down list to determine if taxes are applied for this customer or not;
§ For taxable customers, enter the Tax Number;
§ Specify the Date of Excuse from paying taxes;
§ Enter the Tax Centre Description;
§ Enter the name of the Tax Centre;
§ Enter the Plan of Taxation and Tax Taking Property;
§ Specify the tax account from the suggested box ;
§ Click ![]() to save your work;
to save your work;
Related Topics
| |