

| Financial 2013 Add/Edit Expenses Allocation |
   |
To make
a new expense distribution entry, click ![]() in the Advance Payments List block, and
in the Advance Payments Entry block perform the following:
in the Advance Payments List block, and
in the Advance Payments Entry block perform the following:
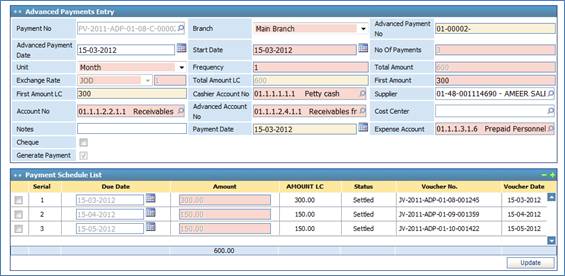
§ Select the Payment Number from a list of payments that was previously defined through the Payments page. Accordingly, the system will retrieve the Total Amount, Cashier Account Number, Supplier and/or Account Number of the selected payment. However, if you leave this field empty, then the system will consider this entry as a cash payment from the supplier’s account to the cashier’s account;
§ Select the Branch of the company;
§ The Advance Payment Number will be automatically generated by the system upon saving;
§ Enter the Advanced Payment Date;
§ Enter the Start Date of the instalments;
§ Select the Unit for the payment (Day, Week or Month);
§ Specify the Frequency of the unit. Example: Every two months;
§ Enter the Number of Payments to be scheduled according to the frequency. Example: Three payments every two months;
§ Enter First Amount of the payment. Accordingly, the First Amount in Local Currency will be automatically calculated by the system;
§ Select the Advanced Account Number and the Expense Account Number;
§ Enter any necessary Notes;
§ The Payment Number will be given by the system;
§ Enter the Payment Date;
§ Check the Cheque checkbox if you want to pay the amount using a cheque;
§ Check the Generate Payment checkbox if you want to auto generate the payment
§ Click ![]() to save your work.
Accordingly, the system will generate a journal voucher for the payment.
Moreover, a schedule of all the expenses and their distributions will be listed
in the Payment Schedule List block.
to save your work.
Accordingly, the system will generate a journal voucher for the payment.
Moreover, a schedule of all the expenses and their distributions will be listed
in the Payment Schedule List block.
Related Topics
| |