

| Financial 2013 Voucher Entry |
   |
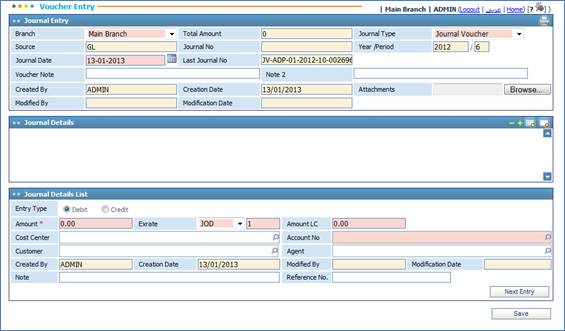
Through the Voucher Entry page you can generate and update different GL Journal Vouchers for specific periods in an open Fiscal Year.
To create a Voucher Entry click ![]() and perform the following
steps:
and perform the following
steps:
§ In the first Voucher Entry block, select the Branch of the company;
§ After each new voucher entry within the same receipt, the system updates the Total Amount at the top of the page;
§ The Journal Type and Source will be given by the system. Since the voucher entry was made from the General Ledger module, the Journal Type will be set to Journal Voucher and the Source to GL;
§ The Journal Number will be given by the system after saving the voucher, based on the segment structure that was previously set through the Financial Setup module in the Segments page;
§ The Year/ Period will be automatically displayed by the system according to the current fiscal year and period;
§ The Journal Date is automatically set by the system to the date of entry. However, you can change it if you want;
§ The Last Journal Number will be given by the system;
§ Enter any necessary Voucher Notes. You can also add notes in the second language of the system;
In the Journal Details block, select the Entry Type (Credit or Debit);
§ Enter the Amount of the voucher;
§ Notice that the Exchange Rate consists of two fields; the currency and the exchange rate. Once you choose the currency, the exchange rate will be displayed. You may change the exchange rate if you wish. Accordingly, the amount will be automatically calculated in the local currency of the company and displayed in the Amount LC field. Note that the currencies and their exchange rates can be defined in the Financial Setup;
§ Select the Cost Centre that will be affected with this voucher transaction. Cost centres can be defined in the Cost Centres sub-module;
§ Select the Account Number that will be affected by the current voucher. Note that in this field, you can enter the account name instead of the account number. Accordingly, a list will appear showing the available accounts that contain the provided number or name. Note that if you’ve already selected a cost centre, then the system will retrieve a list of accounts related to the selected cost centre;
§ Write in any necessary Notes concerning this voucher;
§ Enter The Journal Reference Number if available;
§ Select the Customer associated to this voucher entry;
§ Click ![]() to create another entry, if
so desired;
to create another entry, if
so desired;
§ Click ![]() to save the voucher. Accordingly,
in the Created By field at the top of the page, the system will display
the name of the user who created this entry as well as the Creation Date.
If later on you modify this voucher, the user name and date of modification
will also be displayed in their relevant fields;
to save the voucher. Accordingly,
in the Created By field at the top of the page, the system will display
the name of the user who created this entry as well as the Creation Date.
If later on you modify this voucher, the user name and date of modification
will also be displayed in their relevant fields;
§
Next, you need to confirm the voucher. To do so, you need to move to the
Voucher
Posting page.
Note: No voucher can be generated if the debit and credit total balances of the voucher are not equal. You can reverse vouchers to cancel the effect of their posted amounts. These operations and more can be performed through the Voucher Posting page.
Related Topics
| |