

| Financial 2013 Payment |
   |
Using
the Payment page you are able to perform payment transactions for
various suppliers.
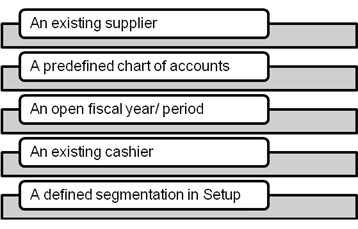
Listed
below are the needed prerequisites before performing a payment:
To add a payment, you need to go through
the following:
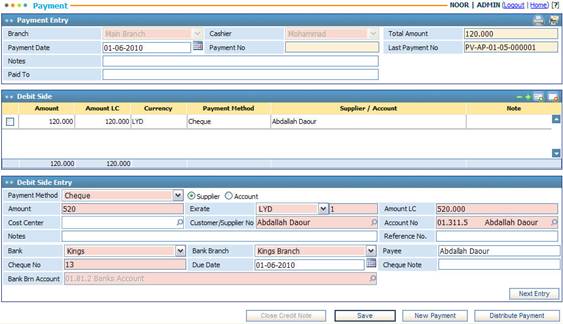
§ In the Payment Entry block, the Branch is automatically displayed by the system;
§ The Cashier name is automatically displayed by the system according to the logged-in username;
§ The Payment Date is automatically set by the system to the date of entry. However, you can change it if you want;
§ The Payment Number is automatically generated and displayed by the system after saving the payment;
§ The Last Payment Number will be automatically displayed by the system;
§ Enter any necessary Notes;
§ Enter the name of the party that this payment is Paid To;
§ In the Payment Details Entry block, select the Payment Method (Cash, Cheque or Electronic Fund Transfer):
- If the ‘Cheque’ payment method was selected, then you need to select the Bank and Bank Branch of the cheque. Accordingly, the system automatically retrieved the Bank Branch Account number. Next, you need to specify the Payee name, Cheque Number, Due Date and Cheque Note;
- If the ‘EFT’ payment method was selected, then you need to select the Bank and Bank Branch of the cheque. Accordingly, the system automatically retrieved the Bank Branch Account number. Next, you need to specify the Payee name and EFT Number.
§ Select the party (Supplier or Account) to whom you are performing this payment transaction;
§ Enter the Amount of the payment;
§ The Exchange Rate will be displayed by the system. By default the currency will be set to the local currency of the company. Yet, you can change it if needed. In all cases, the system will display the Amount in Local Currency;
§ Select the Cost Centre if the payment concerns any;
§ Select the Supplier Number from a list of customers/ suppliers that were previously defined through the Suppliers page. Note that this field is enabled only if the Supplier radio button is selected. Otherwise this field will be disabled;
§ Select the Account Number from a list accounts of that were previously defined through the General Ledger module;
§ Enter any necessary Notes;
§ Enter the Reference Number for this payment;
§ Click ![]() and repeat the previous steps
to add another entry to the payment After each payment entry within the same
receipt, the system will update the Total Amount at the top of the page;
and repeat the previous steps
to add another entry to the payment After each payment entry within the same
receipt, the system will update the Total Amount at the top of the page;
§ Click ![]() to save all payment entries;
to save all payment entries;
§ Once you save the payment, the ![]() button will be enabled. Click
this button to close the Credit Note. Accordingly a list of all credit notes
and their details will appear in the Supplier Credit Note block. Note
that you can edit the Paid Amount through the Supplier Credit Note
block. However, the Paid Amount should be less than or equal to the
payment’s Due Amount for the selected supplier;
button will be enabled. Click
this button to close the Credit Note. Accordingly a list of all credit notes
and their details will appear in the Supplier Credit Note block. Note
that you can edit the Paid Amount through the Supplier Credit Note
block. However, the Paid Amount should be less than or equal to the
payment’s Due Amount for the selected supplier;
§ Click ![]() if you want to distribute
this payment into instalments. Once you click this button you will be
redirected to the Expense Allocation page
through which you can distribute the payment;
if you want to distribute
this payment into instalments. Once you click this button you will be
redirected to the Expense Allocation page
through which you can distribute the payment;
§ Click ![]() to close the current payment
entry and make new payment entry.
to close the current payment
entry and make new payment entry.
Note: It is important to note that only users with cashier privileges can perform payments.
Related Topics
| |