

| Financial 2013 Receipts |
   |
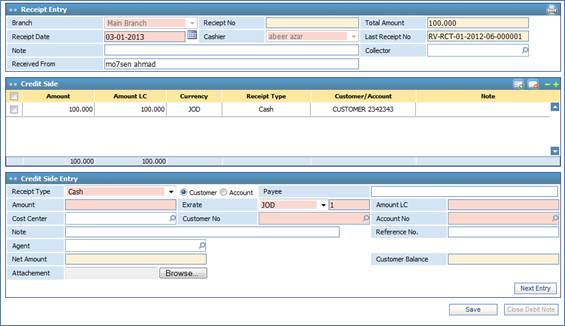
Through the Receipts page you can
perform customer receipt transactions for previously created customer invoices.
To do so, you need to go through the
following:
§ Select the Branch of the company;
§ The Receipt Number will be automatically given by the system upon saving, based on the last receipt serial number;
§ Enter the Receipt Date;
§ Select the Cashier name from the available drop-down list. Cashiers can be defined in the Cashiers page;
§ The Last Receipt Number will be automatically displayed by the system, for tracking purposes;
§ Enter any necessary Notes;
§ Select the Collector name from a list of collectors that were pre-defined through the Codes page in the Financial Setup module. This field is for informative purposes only, it has no effect on the system;
§ Enter the name of the person the receipt was Received From;
There are three methods of payment throughout the system. Through the Credit Side Entry block, select the Receipt Type (Cash, Cheque, Credit Card or Bank Transfer), then perform the following:
- If a customer is paying through Cash then you need to select the Account Type. Select the Customer radio button if the receipt is for a certain customer account. Accordingly, the Customer Number field will be enabled and the Account Number is disabled; enter the customer account number in the Customer Number field. Select the Account radio button if the receipt is for a specific account number. Accordingly, the Account Number field is enabled and the Customer Number field is disabled; enter the Account Number. Note that these accounts are defined in the Chart of Account page;
- If a customer is paying by Cheque, then you need to enter the Cheque Number, its Due Date, and the name of the Drawee. Check-in the PDC checkbox if this cheque entry is a post-dated cheque. Finally, specify the Bank name, Bank Branch and Bank Branch Account number;
- If a customer is paying through Credit Card, enter the Credit Card Type and Credit Card Number. Credit Card Types, Commission Percentages, Accounts and Status are pre-defined in the Credit Cards Setup page located in the Financial Setup module;
- If a customer is paying through Bank Transfer, enter the Bank Date, Bank Reference number of the transfer. Next, you need to select the Bank, Bank Branch and Bank Branch Account number.
§ Specify the exact name of the Payee;
§ Enter the received Amount. By default the Currency will be the local currency of the company; yet, you can change it if needed. In all cases, the system will calculate the Amount in the Local Currency and provide the related Exchange Rate;
§ Select the Cost Centre related to this receipt. Cost centres were previously defined through the Cost Profit Centres page of the General Ledger page;
§ Select the customer account number in the Customer Number field. If the customer has a predefined account number associated to him/ her, then the system will automatically retrieve the Account Number. Otherwise, you need to select the Account Number from a list of accounts that were predefined in the Chart of Accounts page of the General Ledger page;
§ Enter any necessary Notes;
§ Check-in the VAT checkbox to apply the Value Added Tax to the receipt;
§ Enter a Reference Number for this receipt;
§ Select the Agent name from the dropdown list;
§ The Net Amount and the Customer Balance will be auto calculated and filled;
§ Select the Attachment by clicking on browse to select the document path;
§ If you want to include more payments through
this same receipt, click again in the Credit Side Entry block and then
click ![]() . You then need to repeat the previous steps to enter more customer
payments by other payment methods;
. You then need to repeat the previous steps to enter more customer
payments by other payment methods;
§ After each new payment within the same receipt, the system will update the Total Amount at the top of the page;
§ Finally, click ![]() to save this receipt
transaction;
to save this receipt
transaction;
§ Click ![]() ; accordingly, the Customer Invoices block will appear and a
list of all the customer's notes and invoices appear showing the Total
Amount, Due Amount, and Paid Amount by the customer. You may
change the Paid Amount. Note that the paid amount cannot be greater than
the due amount nor can it be greater than what the customer paid in the
receipt;
; accordingly, the Customer Invoices block will appear and a
list of all the customer's notes and invoices appear showing the Total
Amount, Due Amount, and Paid Amount by the customer. You may
change the Paid Amount. Note that the paid amount cannot be greater than
the due amount nor can it be greater than what the customer paid in the
receipt;
§ The system will generate a receipt voucher, which you can view through the Transactions page in the General Ledger module to post and confirm the posting of the voucher;
§ Upon closing a debit note the ![]() button appears. Click this
button to view all the customer's paid invoices for the current receipt. You can
edit the Paid Amount through this step. Simply enter the Paid Amount
in the Customer Paid Invoices block, then click
button appears. Click this
button to view all the customer's paid invoices for the current receipt. You can
edit the Paid Amount through this step. Simply enter the Paid Amount
in the Customer Paid Invoices block, then click ![]() . Note that the Paid Amount must be less than the Due
Amount;
. Note that the Paid Amount must be less than the Due
Amount;
§ Upon saving, the ![]() button
will appear. Click this button to apply any changes to
the receipt;
button
will appear. Click this button to apply any changes to
the receipt;
§ Click ![]() to add a new receipt for the
same customer.
to add a new receipt for the
same customer.
Related Topics
| |